

 en
 English
 русский
 Español
 عربى



HDPE Drainage Pipe Installation: A Practical Site Guide for Contractors
Industry News-Content
- 1 Why HDPE Drainage Pipe Is Chosen for Buried and Above-Ground Lines
- 2 Checks to Complete Before the First Joint Is Made
- 3 Selecting the Right Jointing Method
- 4 Trench Preparation, Bedding and Gradient Control
- 5 Butt Fusion: A Step-by-Step Installation Sequence
- 6 Support Spacing, Bending Limits and Pipe Penetrations
- 7 Testing, Backfill and Handover
- 8 Common Installation Mistakes to Avoid
- 9 How Suban Supports Drainage Projects
HDPE drainage pipe installation is less about muscle than about sequence. The material itself is forgiving: it flexes with ground movement, shrugs off abrasion from grit and gravel, and, when joints are fusion-welded correctly, stays leak-tight for decades. What decides whether a run passes its test is everything around the pipe — the trench, the bedding, the jointing discipline and the checks completed before backfill.
Below is the practical sequence we share with contractors, distributors and project engineers who buy drainage systems from us. It covers material verification, jointing options, bedding and gradient control, support and penetration details, and the testing steps that keep a drainage line off the repair list.
Why HDPE Drainage Pipe Is Chosen for Buried and Above-Ground Lines
Coils of 50 m to 100 m mean far fewer joints than a rigid system, and every joint removed is a potential leak removed with it. The smooth bore keeps flow velocities steady, the material tolerates the mildly acidic and alkaline effluent found in many industrial and municipal networks, and its abrasion resistance suits stormwater and grit-laden flows.
Flexibility helps in other ways. A buried HDPE line follows gentle curves without fittings, absorbs settlement and traffic loading better than rigid alternatives, and survives freeze-thaw cycling without cracking. Above ground, the same properties make it useful for chemical plant drainage, temporary bypass lines and pump discharge runs.
Checks to Complete Before the First Joint Is Made
A few minutes of verification at the laydown area saves days of rework later.
- Confirm the pipe marking against the specification: the standard referenced, nominal diameter, wall thickness or SDR, and the polyethylene grade.
- Inspect coils and straight lengths for deep scratches, gouges, flattening or kinks, and cut back damaged ends square before jointing.
- Check fusion equipment before mobilising: heater plate temperature, calibrated pressure gauge, clean scraper or reamer, and a generator that will not drop out mid-weld.
- Walk the route and verify invert levels, cover depth, gradient, and the position of inspection chambers, connections and penetrations.
- Make sure bedding and backfill material is approved and on site before pipe is laid, not after.
Storage deserves attention too. Keep coils and lengths on level ground, away from sharp objects and heavy plant traffic, and respect the manufacturer's guidance on UV exposure for pipe stockpiled outdoors. A pipe that has been sitting in direct sun for months is not the same product as one that came off the line last week.
Selecting the Right Jointing Method
Most drainage sites use one of four jointing methods. The choice usually comes down to diameter, trench access and whether the joint is part of new construction or a tie-in.
| Jointing method | Best suited to | What to watch |
|---|---|---|
| Butt fusion | New pipelines and long straight runs, from roughly 63 mm upward | Alignment and a calibrated machine; mismatched melt beads weaken the joint |
| Electrofusion | Tight trenches, repairs, tie-ins and confined plant areas | Fittings must be clean and dry; clamping and cooling times must not be shortened |
| Mechanical and flanged joints | Connections to pumps, chambers, manholes and other pipe materials | Gaskets must match the pipe outside diameter; use supplier torque values |
| Socket fusion | Small diameters and service connections | Heating and insertion times change with diameter and ambient temperature |
Trench Preparation, Bedding and Gradient Control
A flexible pipe performs only as well as its embedment allows. A common approach is a trench width of roughly the pipe outside diameter plus 300 mm to 400 mm of working space on each side, with a compacted granular bedding layer under the pipe and haunching brought up to the springline.
Gradient is the other half of the story. Gravity lines rely on a consistent fall; a run that rises in the middle holds water, and standing effluent is the start of every blockage complaint. Set the design gradient from the drawings, check invert levels at every chamber, and verify with a laser or pipe level before the pipe is bedded in. Small-diameter gravity lines commonly need a steeper fall than large trunk mains, so follow the project specification rather than a single rule of thumb.
Backfill in layers of roughly 150 mm to 300 mm, compacting each layer before the next, and never drop heavy, sharp or frozen material directly onto the pipe.
Butt Fusion: A Step-by-Step Installation Sequence
Butt fusion is the workhorse joint for HDPE drainage pipe. The sequence is simple; the discipline is what matters.
- Clamp both pipe ends in the fusion machine, align them and confirm the outside diameters match.
- Face the ends with the trimmer until a continuous ribbon of material appears on both sides, then remove the swarf.
- Close the ends and check alignment and gap, bringing them together against drag pressure to confirm both faces are square.
- Insert the heater plate, bring the ends to melting pressure, then hold the correct heat-soak time.
- Remove the heater plate and bring the molten ends together within the switching time specified by the machine supplier.
- Hold the joint under pressure while it cools, and do not release the clamps early to save time.
- Inspect the external bead: it should be even, rolled over on both sides, and free of gaps or contamination.
Electrofusion and mechanical couplings handle the joints a butt fusion machine cannot reach: repairs, tie-ins, chamber connections and transitions to other materials. Each has its own preparation requirements, and cooling times must never be shortened.
Support Spacing, Bending Limits and Pipe Penetrations
Above ground, HDPE needs continuous support. Hanger and bracket spacing depends on diameter, wall thickness and fluid temperature; for small-diameter lines it commonly falls between 0.6 m and 1.5 m, with closer spacing at higher temperatures. Ask for a support table rather than guessing on site.
Cold bending is one of the material's real advantages, but the allowable curvature has limits. The widely used rule of thumb caps the bend radius at roughly 20 times the outside diameter, with tighter limits close to joints. We explain the reasoning and the practical numbers in our note on the HDPE bending radius rule.
Where a drainage pipe crosses a foundation wall, floor slab or chamber wall, the penetration is a waterproofing detail, not an afterthought. Cast-in water-stop collars are the most reliable way to seal that crossing, and they should be positioned and fixed before concrete is poured.
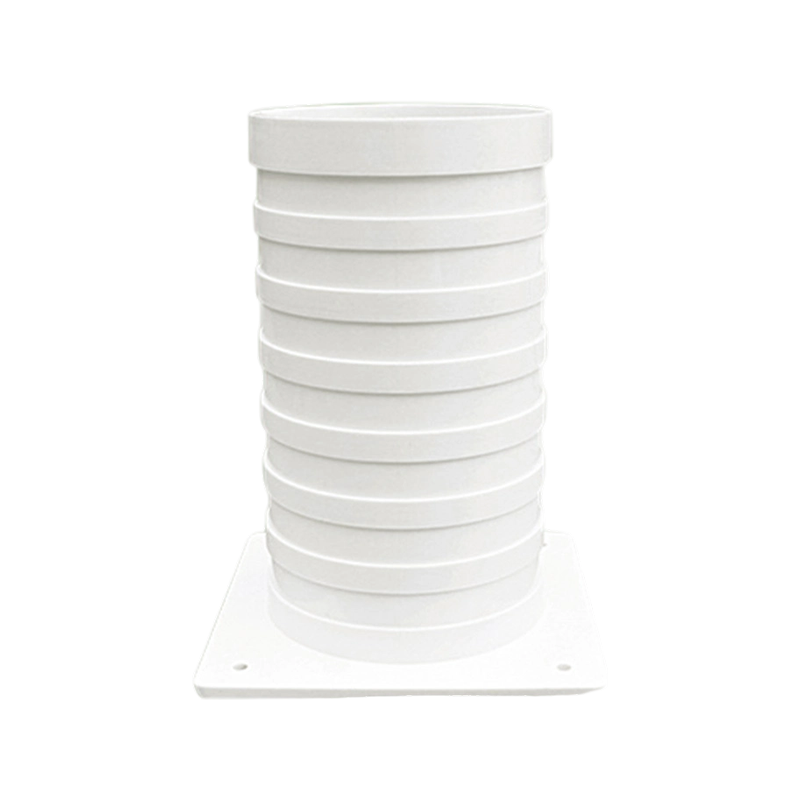 15cm PVC Reinforced Water Stop CollarOur product, the "15cm PVC Reinforced Water Stop Collar," is a high-quality waterproof sealing component specifically designed for underground engineering, constructio...View Product →
Vertical stacks and long above-ground runs also need a movement allowance. Thermal expansion in a tall drainage riser is real, and a stack with no room to move will either pull at its joints or bow.
Testing, Backfill and Handover
- Test before backfill. A hydrostatic or air test on the completed section is far cheaper than excavation later; follow the specified test pressure and duration.
- Check deflection after backfill on flexible pipe, using a mandrel or CCTV survey, to confirm the embedment is doing its job.
- Record as-built information: pipe material, diameter, joint positions, chamber locations and any repairs.
- Hand over with the test records, support and penetration details, and a short maintenance note for the owner.
Common Installation Mistakes to Avoid
- Jointing in rain, wind or dust without protection, which leaves contamination in the melt zone.
- Releasing fusion clamps early to speed up the crew, then wondering why a joint weeps.
- Laying pipe on a trench bottom with rocks, hard lumps or frozen material.
- Skipping the gradient check and trying to correct falls with backfill instead of bedding.
- Leaving penetration seals until after the concrete has cured.
- Stockpiling pipe in direct sun for months while the first section of the line is being built.
How Suban Supports Drainage Projects
Shanghai Pilsa Pipe Industry has been manufacturing pipe and fittings under the Suban brand since 2003, with production bases in Shanghai and Zhoukou, Henan, and a portfolio that runs from PPR hot and cold water systems to PVC-U drainage, PVC electrical conduit, PE-RT underfloor heating, and HDPE drainage pipe and double-wall corrugated pipe. We have served export markets for more than eight years and ship to over 20 countries, so the questions that come up in a drainage specification — sizes, jointing methods, accessories, packing for sea freight — are ones we answer every week.
When a building transitions from a buried HDPE run to an above-ground PVC-U stack, the riser still needs a movement allowance, and our drainage range includes expansion joints sized to the pipe series for exactly that detail.
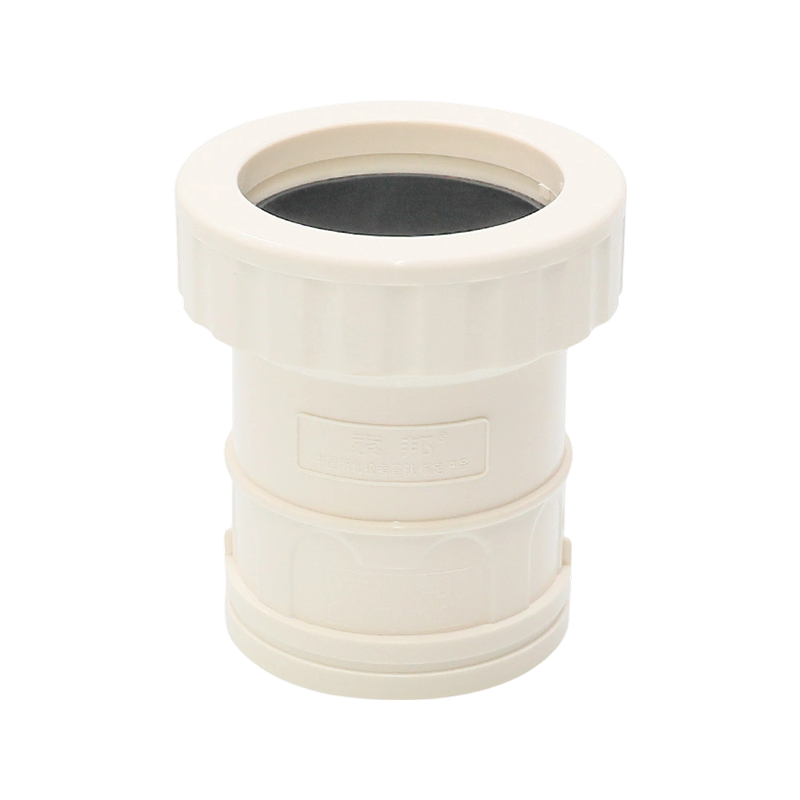 PVC Expansion JointPVC Expansion Joint is specifically designed to address thermal expansion and contraction issues in piping systems, effectively absorbing displacement and vibration ca...View Product →
If your project needs more than pipe alone, browse our full range of pipe and fitting systems or send the drawings and bill of quantities through our quote form. Our team will come back with a matched list of pipe, fittings and accessories rather than a partial one.
HDPE drainage pipe installation is a chain of small decisions — the bedding, the melt time, the gradient check, the penetration seal. Get those right and the line will serve quietly for decades. If you would like a second opinion on a specification or a matched quotation for pipe and fittings, our team is ready to help.
Our Product //
Recommend Products
 +86-13801995968
 +86-18017886575

 No. 366, Lane 6995, Puxing Road, Fengxian District, Shanghai
Copyright © SHANGHAI PILSA PIPE INDUSTRY CO., LTD. All rights reserved.

